Thursday, May 10, 2012

More Bacon, I mean Party Chicken!

Who could turn down an easy recipe with chicken wrapped in bacon? When I pinned this recipe on Party Chicken I just had to try it. After all, we have established already that everything is better with bacon right?


So I tried it...I will save my opinions till after I tell you how it was made.

According to the pinned image (there wasn't a link to a website with a full recipe), you were to wrap boneless, skinless chicken breast tenderloins in bacon lay them in a 9x13 baking dish and cover with a mixture of cream of chicken soup and one cup of sour cream. You are then supposed to cover the dish with aluminum foil and bake at 225 degrees for 4 hours. Then remove the foil and bake at 350 degrees for around 15 minutes. The original pinner stated that it would be so tender and tasty and that you could cut it with a fork. So let's see...


Wrap boneless, skinless chicken breast tenderloins in bacon and lay them in a 9x13 baking dish - Check!


Cover with a mixture of cream of chicken soup and one cup of sour cream - Check!


Then I was to cover it and cook it at 225 degrees for 4 hours. This is what it looked like after four hours. So far it doesn't look tasty.


After cooking it for 15 minutes at 350 degrees this is what I was left with. The chicken was tender and juicy and I could cut it with a fork as promised. One problem, it lacked flavor. Also, I couldn't look at the pan and see all of that grease floating around while trying to eat it. The hubby and kids ate it but they didn't just love it and neither did I. 

My recommendation: Don't waste your chicken unless you see something in the recipe that I missed. There are way too many easy chicken recipes out there that satisfy my families taste buds and this just isn't one of them. I did try to find the original pin to see if there was something that I missed. After going through 30 (yes, 30) different Pinterest users I did find the original. No link or anything to a full recipe that I could find. 

Have you tried this recipe? If so, leave me a comment and tell me about!

I'm Back!

Wow! I took way too long of a hiatus from blogging about my pinned creations. I apologize for such but I work full-time and teach a masters level course for a university each Spring. Needless to say, I got a little too busy.

Stay tuned for some of the recipes that I have tried lately. Some worked and some flopped! Happy pinning!

Tuesday, February 7, 2012

Is Your Glass Stove Top Clean?

Do you have a glass top stove? If you are like me you do and you loved it when you first got it. The top was so clean and shiny. You didn't have those weird looking electric burners to clean up. But let's face it, that stove top never looked the same after it's first use. No matter what I did to clean it I could never get that shine back. And don't even think of trying to use an iron skillet. I tried to be careful and not move it to save the scratches but it didn't matter. It looked so sad. I have purchased the official cleaners, tried home remedies and to no avail. And then came Pinterest...

I found this post on Pinterest and thought why not it couldn't hurt to try it right?


Well, guess what? It actually does work! Baking soda has to be one of those amazing products that will last forever. I followed the instructions of the original post from Behind the Studio. Here are my step-by-step pictures that I snapped along the way:
My glass top stove. The non-shiny glass top that it is.

The ingredients: a bowl of hot soapy water, a few towels, and baking soda

I dumped a whole bunch of baking soda on the glass top.

Then I placed several towels that had been soaking in the hot, soapy water
After 15 minutes and one wipe down this is what it looked like.
After several wipes attempts to remove the baking soda paste. This is what it looked like. It was already cleaner than before.
The overall process worked well. I do have to warn you it was rather messy. I had to clean it several times to get all of the baking soda cleaned up. I also took the opportunity to soak my burner knobs in the hot, soapy water. They shined and sparkled as well.

I have to tell you that I think if I did this periodically that I could actually have a like new glass top again. It's a miracle! Oh Pinterest how you have changed my life...

Have any of you tried this with your glass top stove? What about other remedies that work? I would recommend trying this if you haven't!

Thursday, February 2, 2012

Everything Is Better with Bacon

Everything is better with bacon, right? According to my husband it is! When I saw this post on Pinterest I just had to try it.


I detest cooking bacon on the stove. It is stinky, greasy and let's face it I burn myself at least once every time. I actually had no idea this was even possible. I may be the only one in the world that didn't know but I tell ya it worked! I followed the directions per the original website and it worked like a charm.

Here are the step-by-step pictures:
First, I lined the cookie sheets with parchment paper.

I laid the bacon out trying to space them apart. Notice it took me two cookie sheets? I need new cookie sheets!


Half way through the cooking


The finished product

Now I know this does not look all that great but let me assure it the grease stayed in the paper and the cookie sheet. I had crisp, evenly cooked bacon. To top it off, all I had to clean up were the two pans and not a grease-splattered kitchen. I also had time to prepare the rest of our breakfast for dinner meal. It was postivitely wonderful!

I would highly recommend cooking bacon this way. My family loved it and I didn't have to be treated for any burns. It was a great night!

Monday, January 30, 2012

Closet Rehab

At the beginning of the new year, I started going through every cabinet, closet, storage-ish area I could find in my house. Mostly because I am about to put my house on the market and wanted to appear uncluttered however, after starting I could not stop. Then I ran across this post on Pinterest that someone repinned this year.


What a great idea! How many of you have items in your closet that you rarely wear? I hate to say it but I have tons of items. My closet is so full sometimes I cannot even find the one item that I am looking for. When I ran across this idea I thought that this would be more fun that the usual sort and toss. The idea is to turn all of your hangers around backwards and as you wear an item place it back in your closet (preferably clean!) the right direction. Then on June 1st pull out those times that have not been worn and donate them.

This is what my closet looks like as of January 15th.


Wow, I cannot believe I just posted pics of my closet! Welcome to my clutter :-)

Now, I am the first to admit that the separation from those items on June 1st gives me a little anxiety. Also, we have four seasons here in TN where I live. I cannot imagine having gone through a reasonable amount of my clothes by June 1st. With that said, I plan on assessing how many items I have actually worn every three months and doing a final sort and toss at the end of the year. I can already see a pattern in what I wear and I have to admit by doing this it is causing me to be a little more creative in picking out my clothes each day.

I few things I learned while recreating this pinned item:

  • It's not easy to hang your items backwards. Seriously, you feel like you are doing something extremely wrong especially if you are OCD. And with my closet racks it causes the items not to glide as easily so you have to space your items accordingly.
  • It's even harder when your vertically challenged! I forgot exactly how short I was then I started on the top row of clothes. Hopefully you are as lucky as me and have a wonderful husband willing to help you like mine did or perhaps a tall friend. 
  • You will find items you didn't even know you had. Seriously, I found items that still had the tags on them. How sad is that? 
I hope by doing this it not only raises my awareness of my compulsive shopping problem but also how many items I actually 'need' verses want. How many of you have a system in periodically cleaning out your closet?

Saturday, January 14, 2012

Chalk It Up to a Little Paint

 I was so inspired by this picture I pinned from Good Housekeeping magazine. I had also seen so many other chalkboard paint ideas that I had to try out the paint on something. So I decided to paint the inside of my pantry door. What could it hurt? If it looked awful at least it is on the inside right?

I went to the local Home Depot and checked out my options. I fount a quart of Blackboard paint that was $9.00. I just about passed out! That is a lot of money for that little quart of paint. I didn't find any other options so I went with what they had. I bought the Rust-Oleum brand Chalkboard paint in the basic black color. I also purchased a sponge roller and a throw away pan. So in all I only spent around $18.00 with tax.

Like I stated above, I chose the inside of my pantry door. It has 'grooves' (not a clue what that is really called) so I decided to just paint the inside on the top. Here is the door before any paint was added.


After I carefully read the instructions (yes, I may have finally learned my lesson!) I applied the first coat of paint on the top section of the door. That is when I thought of this post from Apartment Therapy that I found on Pinterest as well. Instead of just having the top section painted why not paint the bottom and let this be the kids section to write on. I have a 2 and 6 year old. I firmly believe my 6 year is a future artist so I must help provide her with ways to display her talent right?


So I added a coat of paint to the bottom as well. Now, the directions state that you must wait 4 hours before applying another layer of paint. So I applied the first coat of paint then I managed to cook supper, clean the kitchen, bath the kids, put them to bed, watch a little t.v. and then I applied the second coat. Since it was my bed time I wrapped the roller and paint tray in aluminum foil and went to bed. I woke to a painted pantry door that looked really cool but I decided to add just one more coat of paint just to be sure.


After the three coats of paint I was so excited to try it out then I read the directions and found that the surface is NOT ready to use for three days! My kids were appalled (and so was I!). Since I do not have patience and I still had 3/4 of the quart of paint left I start looking for another surface that needed to be a chalkboard. That is when I went upstairs to the kids playroom, cleared a wall and started painting. I followed the same steps as I mentioned above using the same quart of paint. The one thing that I did forgot is to take before and after shots of their wall. Here is a shot of my kids in their pi's enjoying their new art area of the playroom. 


And here is a shot of my pantry door in use. I love this because my husband now has a place to write down what our grocery needs are as we run out. I have also written our menu for the week near the bottom. And of course it entertains the kids for at least a few minutes everyday.  


My review on the chalkboard paint: Spectacular! I only purchased one quart of paint, one roller and one paint tray and created to spaces. I am still shocked that I didn't need a second quart for the kid's playroom. The wall is much longer than what you see in the picture above. I am looking forward to finding additional areas or items to utilize the rest of that quart of paint. Not bad for $18!

One thing I have not done is find or create a good place for the chalk. Do you guys have any good suggestions? Leave me a comment below to give me your ideas!

Friday, January 13, 2012

Southwestern Egg Rolls

Just hearing the name Southwestern Egg Rolls makes me want to go to Chili's and order some. I never thought that it was something that I could make at home until I found the recipe on Pinterest! I decided to try out this great recipe from Annie's Eats for a recent party. Turns out the egg rolls were a hit! Read on to see how I made them and my final review.


I read the recipe carefully and headed to Kroger for the ingredients. Having never purchased egg roll wraps before I wasn't sure where to locate these in the grocery store. Just as an FYI, I did locate them in the produce section.


I mixed all of the ingredients  according to the recipe and it turns out that it makes a whole lot! I actually purchased two packages of the egg roll wraps and was glad I did.


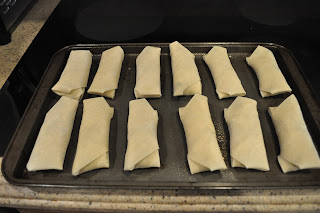
Next I had to actually wrap the egg rolls. Having never done this before I wasn't sure how this would turn out. I followed the recipe's instructions and it turns out that it really wasn't that hard. Here are some pictures to illustrate my steps (please ignore the non-manicured hands!):


I actually had three pans of these to bake. It was amazing how much this recipe actually did yield. I baked the egg rolls according to the recipe and look how great they turned out! They were a hit at a party and the next day for my lunch. 

My official review is WOW! These are wonderful if you like the Southwestern Egg Rolls appetizer at Chili's. They are easy to make and great to eat. Plus it made double of what I thought it would. I had around 40 egg rolls so I suggest buying two packages of the egg roll wraps. Simple, easy appetizer to take for a party! Thank you Annie's Eats!

Thursday, January 5, 2012

Measuring Up

After seeing this pinned by several on Pinterest, I couldn't resist looking into this measuring cup organizing idea. After all, my husband has no idea what to do with those clean measuring cups and spoons once they are clean. Do you find yours just any where in your kitchen? Every time I go to find one it is never where it needs to be and of course I end up settling for whichever one is available. Maybe this is why my recipes always turn out weird?

Moving on...I thought this was genius so I visited Infarrantly Creative's site to see exactly what I needed. I made my list based on Infarrantly Creative's site and headed out for supplies. I have never been known to follow directions so I missed the part where she mentioned the size of hook as well as getting spray paint. Once I got all of the supplies I headed home ecstatic to get started.


First, I picked the perfect cabinet door. I noticed that on the original blog she mentioned that she converted from metal to plastic cups because of the noise. I personally prefer to measure with metal cups (I'm weird and spoiled I know!) so I picked a cabinet door that is near the stove but not opened a whole lot.


After I measured the width of the paint stirrers, I had my husband cut them. He used a hand saw and it did just fine. He also went ahead and predrilled the holes and sanded the edges for me.


I started painting the stirrers. Remember when I stated above that I don't follow directions very well? I missed the spray paint part and bought just regular craft paint and painted them. Four coats later I reminded myself of the importance of following directions!


Since I didn't read that direction I thought that it would be smart to go back to the original and read up one more time. I found that you could purchase the labels pretty cheap from an online supplier - Say it on the Wall.  I went ahead and ordered the labels for the measuring cups that was pictured. It arrived within 3 days and this was on a holiday week. Very cool!

Now I was ready to install so I started looking for all of my measuring cups and guess what? I couldn't find even half of them. So I couldn't very well not have a complete project so I just went and bought a complete set and I have to say it was the best decision I made yet on this project. I laid out the cups and marked my holes for the cup hooks. I also affixed my vinyl labels.

Then I summoned my husband to grab his drill one more time and get to work. He drilled the holes for all of the hooks as well as the ones to affix the two paint stirrers turned cup holder to the cabinet door. Once we got all of the hooks screwed in we hung the largest cup and spoon and marked the location for their final resting place. Once it was installed it was like a tiny miracle in my kitchen! I am so excited to have a location for all of my measuring cups and spoons. I even took a little time to walk my husband through how to hang them on the hooks just in case ;-)


Isn't it just marvelous?

My Review: I have to say that an amateur can do this. We did it without a power saw but did need a drill. The metal cups are noisy but I also don't open that cabinet door a whole lot. I spent around $35 with my largest expense being the new measuring cup set. Overall this was a great find on Pinterest!

Thank you to Infarrantly Creative and Say It on the Wall!

Monday, January 2, 2012

Let's Get This Started

It is a new year and that means I spent the last week thinking of the dreaded resolution for the new year. I have grown to dislike a new year's resolution only because I seem to be the one that never follows through. With that said, I started thinking about all of the things that I would like to accomplish when I started looking for inspiration on Pinterest. If you have spent any time on this virtual pin board website you will know what happened next. I spent the next two hours pinning ideas and recipes that I will never make or experience. I read an article that mentioned Pinterest has grown from 1.5 million users in August 2011 to 4 million in December 2011. Then it hit me...why am I spending all of this time pinning and not doing!


So I have decided that I am going to start using some of my inspiration from Pinterest and creating some of the inspiring pins and share my experience. I want to know if some of those recipes really are the best ever and if those DIY projects are actually possible for the average person like me. Stay tuned for my reviews!